3 minutes
How to install CakePHP
I will be using an Ubuntu Server 12.04.3 droplet from Digital Ocean to install CakePHP but I won’t be covering the installation of Apache, MySQL and PHP.
Installing CakePHP
Download CakePHP and extract the tar then move the folder to /var/www/cake
wget https://github.com/cakephp/cakephp/archive/2.4.6.tar.gz
tar -xzf 2.4.6.tar.gz
sudo mv cakephp-2.4.6/ /var/www/cake
Change the permissions of app/tmp so that the web server can write to it and also change the owner group to www-data
sudo chown -R root:www-data /var/www/cake/app/tmp
sudo chmod -R 775 /var/www/cake/app/tmp
Now we need to make sure that mod_rewrite is enabled and enable it if it isn’t.
sudo apache2ctl -M | grep rewrite
sudo a2enmod rewrite
Now we need to make sure the Allow Overrides is set to all for /var/www, We do this by editing /etc/apache2/sites-available/default. Find the line highlighted below and replace None with All
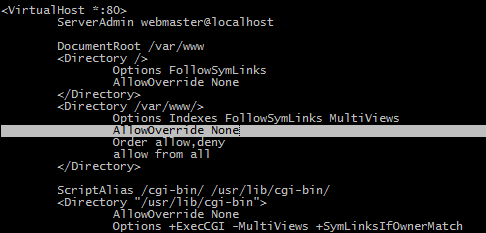
sudo nano /etc/apache2/sites-available/defaultOnce changed restart the Apache service
sudo service apache2 restartNow that is done you should be able to go to http://host/cake and see something similar to the image below, Don’t worry about the notices we are going to remove those next.
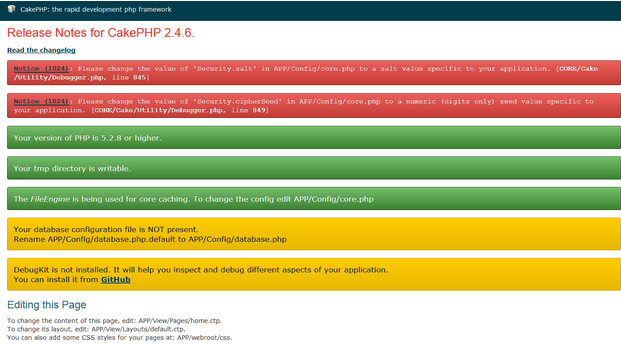
We are going to change the Security Salt which is used for the hashing methods and the Security Cipher Seed which is used to encrypt / decrypt strings.
We will need to open core.php which can be found under /var/www/cake/app/Config/ and we are looking for the below:
<?
/**
* A random string used in security hashing methods.
*/
       Configure::write('Security.salt', 'DYhG93b0qyJfIxfs2guVoUubWwvniR2G0FgaC9mi');
/**
* A random numeric string (digits only) used to encrypt/decrypt strings.
*/
       Configure::write('Security.cipherSeed', '76859309657453542496749683645');
Change these values to anything you want but make sure the Cipher Seed is numbers only, For the Security Salt I normally just use a password generator and set it to 40 characters and make sure there are no apostrophes in the string.
Database Configuration
Create a new database and user using the command line or phpmyadmin (other clients are available). The snippet below will work from the command line and will make a new database called cakephp and then a user called cakephp that can logon from the localhost with the password abc123.
create database cakephp;
grant all privileges on cakephp.* to 'cakephp'@'localhost' identified by 'abc123';
Now you have your database and user account we can set up CakePHP to use it for the connection.
cd /var/www/cake
sudo mv app/Config/database.php.default app/Config/database.php
Now all we need to do is edit the database.php file to add in your information and uncomment one line to enable UTF-8 support with the database. Change the default configuration so it is like below making sure you change the login / password / database information with what you have set up.
<?
class DATABASE_CONFIG {
    public $default = array(
        'datasource' => 'Database/Mysql',
        'persistent' => false,
        'host' => 'localhost',
        'login' => 'cakephp',
        'password' => 'abc123',
        'database' => 'cakephp',
        'prefix' => '',
        'encoding' => 'utf8',
    );
Optional DebugKit
The only warning you will have now is for DebugKit which is an external plugin but it does make life easier while making your application.
wget https://github.com/cakephp/debug_kit/archive/master.tar.gz
tar -xzf master.tar.gz
sudo mv debug_kit-master/ /var/www/cake/app/Plugin/DebugKit
Now add the plugin to the app/Config/bootstrap.php
<?
CakePlugin::load('DebugKit');
Then include the toolbar in app/Controller/AppController.php
<?
class AppController extends Controller {
    public $components = array('DebugKit.Toolbar');
}
Now we just need to change the debug level to 1 in app/Config/core.php and remove sql_dump from app/View/Layouts/default.ctp
app/Config/core.php
<?
Configure::write('debug', 1);
app/View/Layouts/default.ctp – Remove this line
<?php echo $this->element(‘sql_dump’); ?>
That is the end you now have CakePHP installed and configured to use your database and you can start to look at some of the other tutorials around the web and start making your own web application.